


MH505 – Streamlining Warehouse Operations with MHAX: Configuring Sales Order Picking and Inbound Putaway Subscriptions in D365FO
Introduction
A step-by-step guide to setting up and configuring four critical subscriptions in the MHAX module—two for sales order picking (pick and put), and two for inbound putaway (pick and put)—to optimize warehouse workflows
In our integration setup, we use two different subscriptions for the “Pick” and “Put” lines due to the distinct nature of the “Put” operation in Dynamics 365FO. While “Put” is a post-picking operation, our use case involves the External WMS system primarily for picking tasks. The “Pick” subscription is tied to External WMS events, and the “Put” subscription is designated for internal processes, managed through a Logic App. This setup allows us to parse the “Put” details and send them as part of the outbound pick list message from the external MHAX system to Dynamics 365FO, ensuring that the work is accurately closed in Dynamics.
Additionally, there is a challenge with using the work line pair ID, as it closes the work line with the work quantity upon parsing to Dynamics. This must occur only after short pick line transactions have been parsed in Dynamics. Unlike the work line pair ID, the record ID is unique for each line and handles both short pick and full pick transactions effectively. While this approach increases the number of inbound transactions, it offers a controlled and reliable way to manage them. To avoid issues where the work line pair ID might prematurely close neighboring open lines, we will simplify the process by using a record ID for each “Put” and “Pair” transaction.
Step-by-Step Instructions for Creating a Subscription in the Material Handling Interface Module in D365FO
Sales Order Pick
1. Navigate to the Material Handling Interface Module
1.1 Access D365FO:
- Log in to your Dynamics 365 Finance and Operations (D365FO) environment.
1.2 Open the Material Handling Interface:
- Navigate to Warehouse management > Setup > Material Handling > Material Handling Interface.
2. Create a New Subscription
2.1 Access the Subscription Form:
- In the Material Handling Interface, select the Subscriptions tab.
- Click New to create a new subscription.
2.2 Define Subscription Details:
- Subscription ID: Enter a unique ID for the subscription (e.g., PickList-Pick).
- Description: Provide a description (e.g., Sales Order Pick List – Pick).
- Warehouse: Select the relevant warehouse from the drop-down list.
2.3 Set Outbound Transaction Type:
- Outbound Transaction Type: Set this to Work Creation.
2.4 Run Query:
- Ensure the Run Query option is selected.

3. Edit the Query for the Subscription
3.1 Access Query Editor:
- In the subscription form, click on Edit Query.
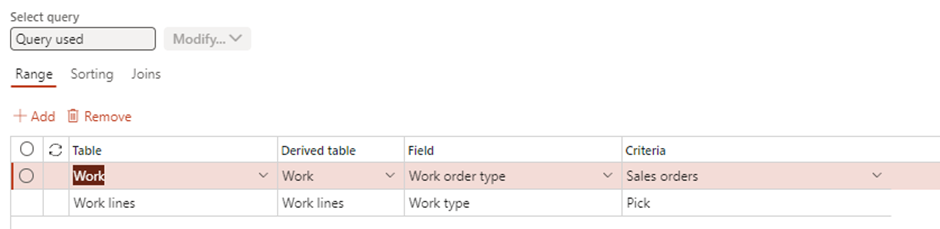
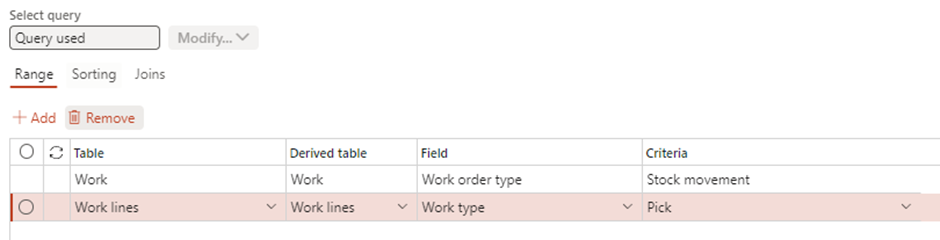
3.2 Set Conditions for Work Order Type:
- In the Ranges tab, add a condition:
- Field: Select Work Order Type.
- Criteria: Set the value to Sales Orders.
3.3 Set Conditions for Work Line Type:
- Add another condition in the Ranges tab:
- Field: Select Work Line Type.
- Criteria: Set the value to Pick.
4. Configure the Subscription Map
4.1 Access the Subscription Map:
- In the subscription form, click on the Subscription Map tab.
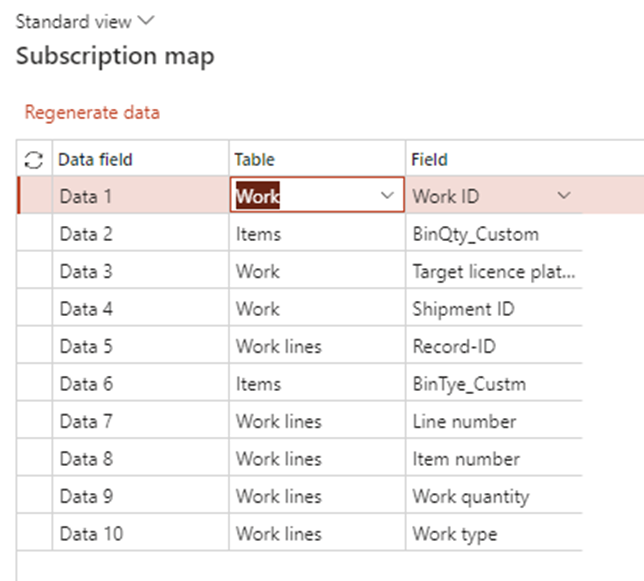
4.2 Add Data Fields to the Subscription Map:
- Add the following 10 data fields:
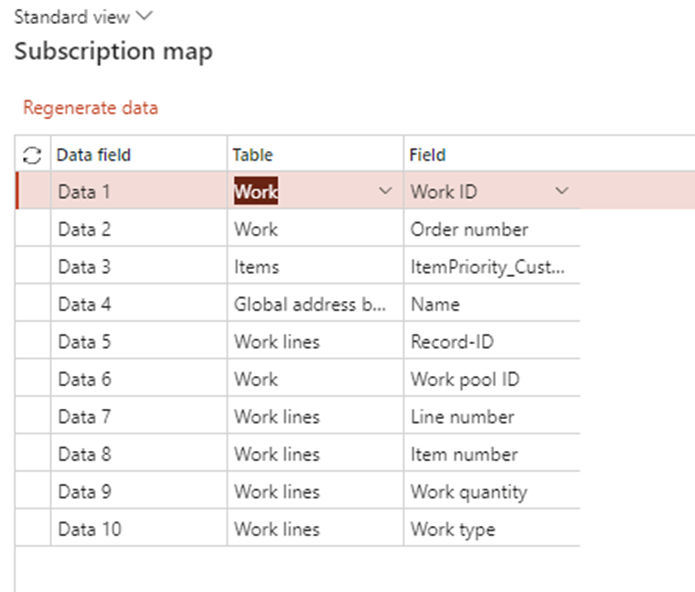
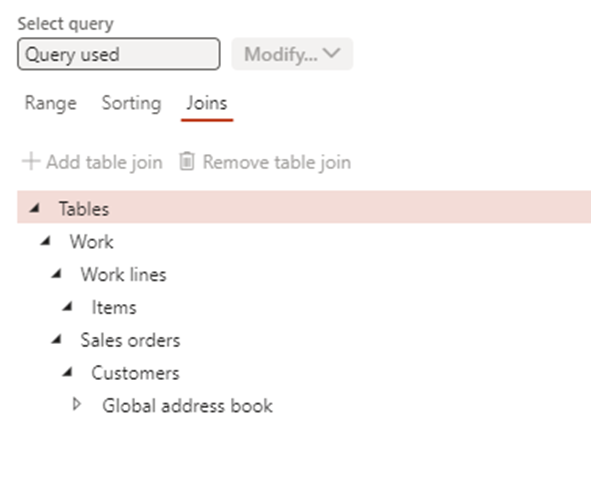
Tip: You can pull information from different related tables by joining them under edit query. You can see Items Table and Global address book.
4.3 Save the Subscription:
- Once all data fields are configured, save the subscription.
5. Validate the Subscription Configuration
5.1 Review the Subscription:
- Double-check that all the settings, queries, and data fields are correctly configured as per the requirements.
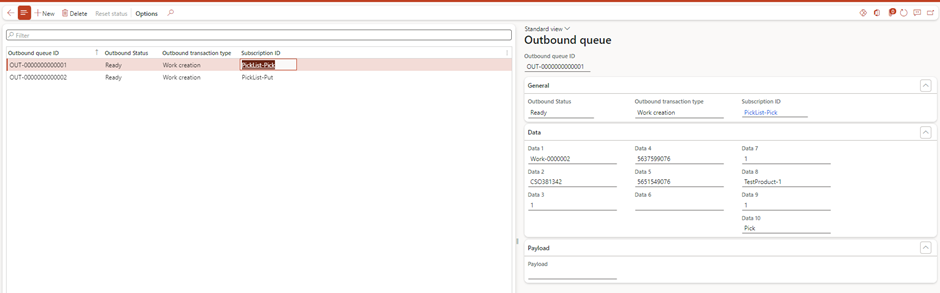
5.2 Test the Subscription:
- Run a test by releasing sales order to the warehouse to ensure that the subscription is picking up work transaction as expected and that the data fields are correctly populated under Outbound Queue. Transaction status will be Ready.
Sales Order Put
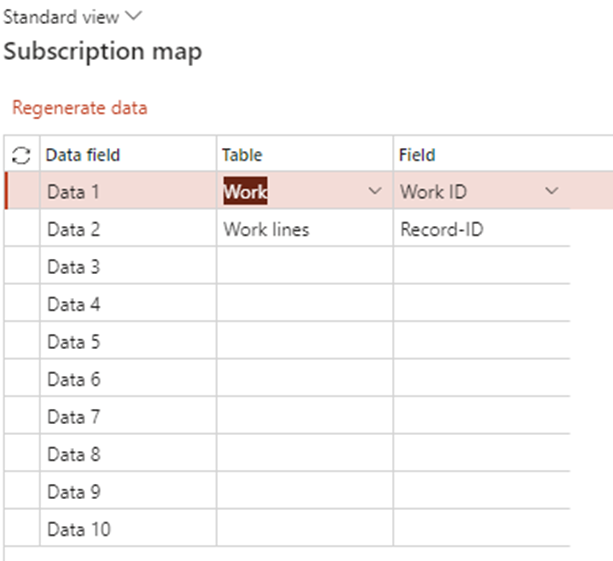
Please follow the steps outlined above to set up the subscription as demonstrated in the provided screenshot. After completing the setup, run a test to verify the transactions in the outbound queue.


Note – we only require work ID and Record ID to close Put Line
Putaway Pick
Please follow the steps outlined above to set up the subscription as demonstrated in the provided screenshot. After completing the setup, run a test to verify the transactions in the outbound queue.

Custom columns are for business requirement for streamlining External WMS system functionality. You can replace them with out of box other fields based on your requirements.
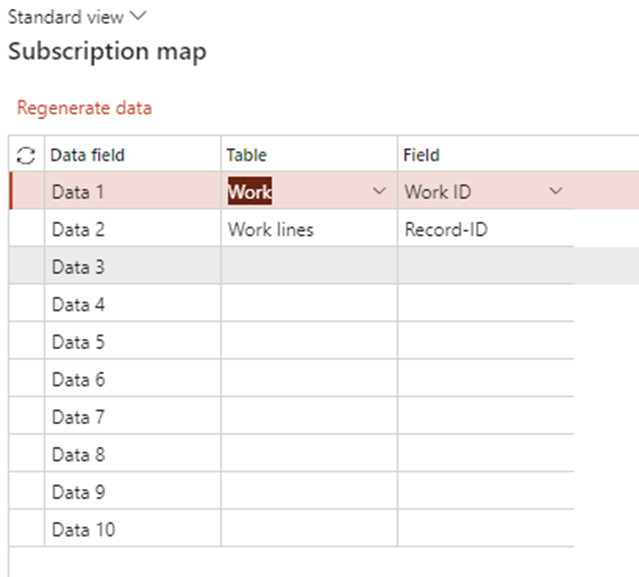
Putaway Put
Please follow the steps outlined above to set up the subscription as demonstrated in the provided screenshot. After completing the setup, run a test to verify the transactions in the outbound queue.

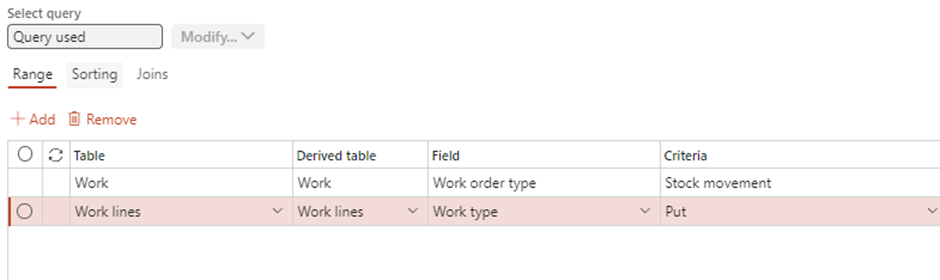
Note – we only require work ID and Record ID to close Put Line
License Plate receiving
License plate receiving is out of scope for this series. However, it follows the same configuration as above. I will provide high level information of this process in later parts of this series.
Expand Your Knowledge: See More Material Handling Blogs
Share this content:


Post Comment