


PP101 – How to Approve Work Items in D365FSCM Seamlessly Using Microsoft Teams

Introduction
In today’s fast-paced business environment, efficiency is key. One area where we can significantly improve efficiency is in the approval process of work items within D365FO. By integrating Power Automate with Microsoft Teams, users can handle approvals directly from Teams, eliminating the need to constantly switch between applications.
Prerequisites:
- Make sure you have power app premium license allocated to your account.
- Make sure you have system administrator or system customiser role to Power platform environment
- Following two virtual entities are configured to use in your dataverse environement
- WorkflowWorkItemEntity
- SystemUserEntity
- You have solution created to hold workflow
Step-by-Step Guide:
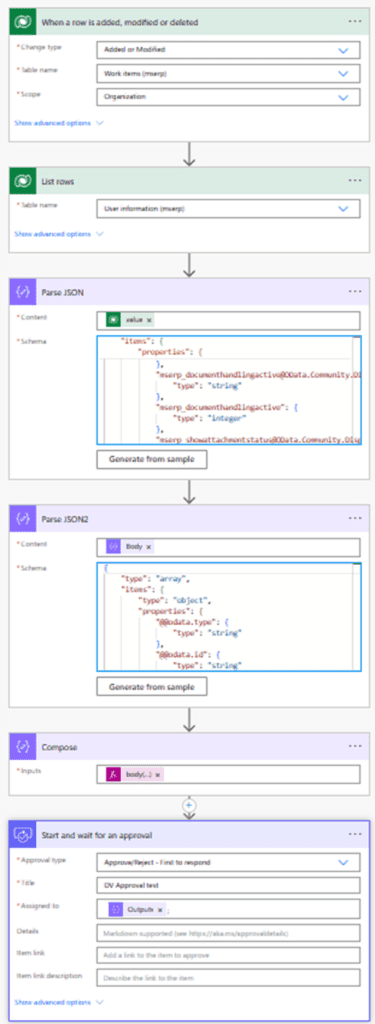
Step 1: Trigger the Flow on Row Addition or Modification
- Create a new flow:
- Open Power Automate.
- Click on Create and select Automated flow.
- Set the trigger:
- Search for the Dataverse trigger When a row is added, modified or deleted.
- Select this trigger and click Create.
- Configure the trigger:
- Change type: Select Added or Modified.
- Table name: Select Work items (mserp).
- Scope: Select Organisation.
Step 2: List Rows from User Information
- Add a new step:
- Click on + New step.
- Select the action:
- Search for Dataverse List rows action.
- Configure the action:
- Table name: Select User information (mserp).
Step 3: Parse JSON Data
- Add another step:
- Click on + New step.
- Select the action:
- Search for Parse JSON and select it.
- Configure the action:
- Content: In the Content field, select value from the dynamic content.
- Schema:
- Copy and paste schema
Step 4: Parse JSON Data – 2
- Add another step:
- Click on + New step.
- Select the action:
- Search for Parse JSON and select it.
- Configure the action:
- Content: In the Content field, select Body from the dynamic content.
- Schema:
- Copy and paste schema
Step 5: Compose Email address
- Add another step:
- Click on + New step.
- Select the action:
- Search for Compose and select it.
- Configure the action:
- Inputs: In the Inputs field, add Expression from the dynamic content.
body('Parse_JSON')[0]?['mserp_alias']Step 6: Start and Wait for Approval
- Add Another step: Click on +New Step
- Select the action: Search for Start and wait for approval and select it.
- Configure the action:
- Approval Type : Select Approv/Reject – First to Respond
- Title: Give title such as D365FO workitem Approval xxxx
- Assigned To: Outputs from Compose action
- Item Link: your environement link followed by &mi=WorkflowWorkListAssignedToMe
Final Workflow
Conclusion
By following these steps, you can create a seamless approval process within Teams, making it easier and faster for users to manage approvals without leaving their collaboration environment.
Expand Your Knowledge: See More Power Platform Blogs
Share this content:


Post Comment