


PP102 – Automating PO Approvals in Microsoft Teams with Managerial Hierarchy in D365FCM
Introduction
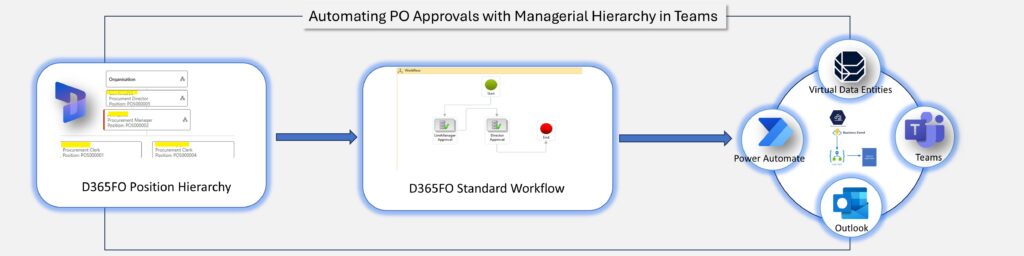
Purchase Order (PO) approvals are critical for financial control. Automating this process can save significant time and ensure compliance with Organisational policies. In this article, I will show you how to set up a Power Automate flow to handle PO approvals based on a managerial hierarchy, with notifications sent directly in Teams.
Prerequisites
- Make sure you have power app premium license allocated to your account.
- Make sure you have system administrator or system customiser role to Power platform environment
- Employees job and positions configured in D365FO. The Three positions are as below
- Procurement Clerk
- Procurement Manager
- Procurement Director
- Employee Report To position is configured.
- Procurement Clerk report to Procurement Manager
- Procurement Manager report to Procurement Director
- Procurement Director
Configure Standard Workflow in D365FO
Step-by-Step Instructions to Create Purchase Order Workflow 000047 in D365
Step 1: Create a New Workflow
- Navigate to Workflow:
- Go to Procurement and sourcing > Setup > Procurement and sourcing workflows.
- Create a New Workflow:
- Click on New.
- Select Purchase order workflow.
- Click Create workflow.
Step 2: Configure the Workflow Properties
- Workflow Name:
- Set the Name to “Purchase order workflow 000047”.
- Provide a Description if necessary.
- Save the Workflow:
- Click Save to save the initial configuration.
Step 3: Add the First Approval Step
- Add Approval Step:
- Drag and drop an Approval step onto the workflow canvas.
- Configure the Approval Step:
- Double-click on the Approval step to open the properties window.
- Step Name and Description:
- Set the Name to “Procurement Manager Approval”.
- Provide a Description if necessary.
- Add Automatic Action:
- Click on the Automatic actions tab.
- Click Add condition.
- Configure the condition as:
- Field: Purchase.PurchaseTotal
- Operator: <=
- Value: £1000
- Set the Auto complete action to Approve.
- Substep Approval Configuration:
- Go to the Assignment tab.
- Set Assignment type to Hierarchy.
- Under Hierarchy selection, select:
- Hierarchy Type: Manager hierarchy
- Start from: Workflow originator
- Stop when the following condition is met:
- Field: employee.PositionTitle
- Operator: =
- Value: Procurement manager
- Save and Close:
- Click Save and close to save the first approval step configuration.
Step 4: Add the Second Approval Step
- Add Another Approval Step:
- Drag and drop another Approval step onto the workflow canvas.
- Configure the Second Approval Step:
- Double-click on the second Approval step to open the properties window.
- Step Name and Description:
- Set the Name to “Procurement Director Approval”.
- Provide a Description if necessary.
- Add Automatic Action:
- Click on the Automatic actions tab.
- Click Add condition.
- Configure the condition as:
- Field: Purchase.PurchaseTotal
- Operator: <=
- Value: 5000
- Set the Auto complete action to Approve.
- Substep Approval Configuration:
- Go to the Assignment tab.
- Set Assignment type to Hierarchy.
- Under Hierarchy selection, select:
- Hierarchy Type: Manager hierarchy
- Start from: Workflow owner
- Stop when the following condition is met:
- Field: employee.PositionTitle
- Operator: =
- Value: Procurement Director
- Save and Close:
- Click Save and close to save the second approval step configuration.
Step 5: Link the Workflow Steps
- Link Steps:
- Link the Start node to Procurement Manager Step.
- Link Procurement Manager Step to Procurement Director Step.
- Link Approval Step 2 to the End node.
Step 6: Activate the Workflow
- Validate and Activate:
- Click Save and close to save the entire workflow.
- Click on Validate to ensure there are no errors.
- If validation passes, click on Activate to activate the workflow.
Configure Power Automate Workflow
Step-by-Step Instructions to Create Power Automate Flow
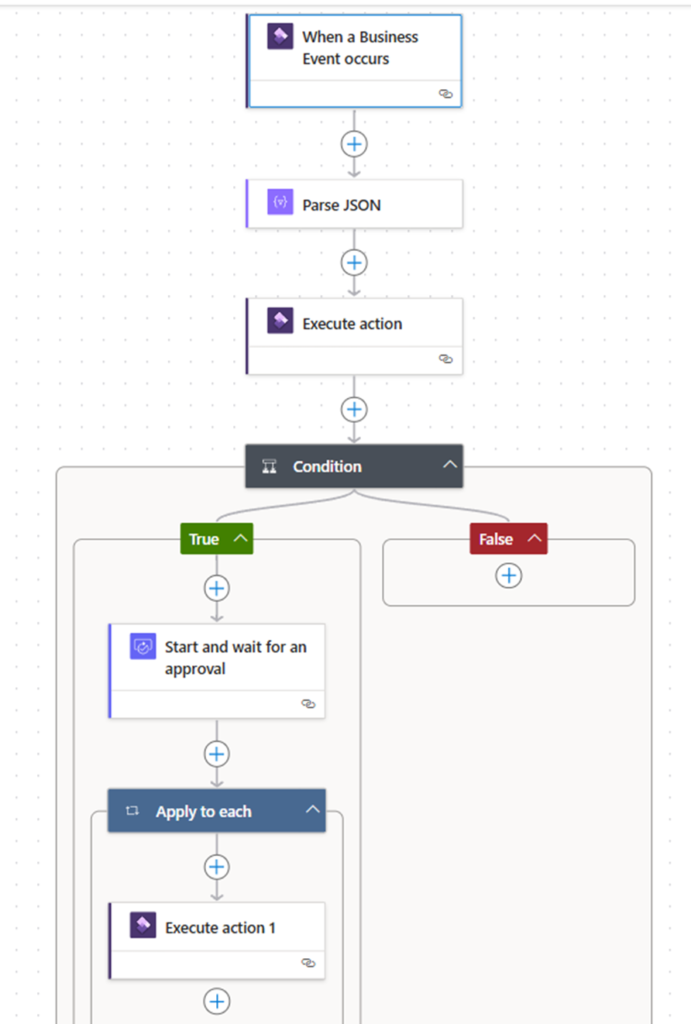
Step 1: Trigger from Business Event
- Create a new flow:
- Open Power Automate.
- Click on Create and select Automated flow.
- Set the trigger:
- Search for When a Business Event occurs.
- Select this trigger and click Create.
- Configure the trigger:
- Business Event: Select Purchase order workflow 000047 – approve purchase order.
Step 2: Parse Data from Event
- Add Parse JSON action:
- Click on + New step.
- Search for Parse JSON and select it.
- Configure the Parse JSON action:
- Content: Select Body from the trigger output.
- Schema: Click on Generate from sample, and provide a sample JSON payload that matches the expected structure of the business event data. For example:
Download Json file and Copy code
Step 3: Workflow Workitem Validation
- Add Execute action:
- Click on + New step.
- Search for Execute action and select it.
- Configure the Execute action:
- Instance – your D365 Environment.
- Action – WorkflowWorkItems-validate
- WorkWorkflowItemInstanceId – WorkWorkflowItemInstanceId from Json output
Step 4: Add Condition to Check Execute Output
- Add a Condition:
- Click on + New step.
- Search for Condition and select it.
- Configure the Condition:
- Condition: Use the output from the Execute action.
- Value: Select Value field from the Execute action.
- Condition: is equal to
- Value: true
- Condition: Use the output from the Execute action.
Step 5: Start and Wait for Approval
- In the True branch of the Condition:
- Click on + Add an action.
- Search for Start and wait for an approval and select it.
- Configure the Approval:
- Title : Give appropriate Title
- Assigned to: Select workflowUserEmail from the Parse JSON output.
Step 6: Apply to Each
- Add Apply to each:
- Click on + Add an action under the Start and wait for an approval step.
- Search for Apply to each and select it.
- Select an output from previous steps: Use the output from the Approval step.
- Inside Apply to Each:
- Click on + Add an action.
Step 7: Execute Action1 to Complete Workitems
- Add Execute action:
- Search for Execute action and select it.
- Configure the Execute action:
- Instance: Select your UAT Environment
- Workflow Instance ID: Set to workflowInstanceId from Parse JSON output.
- Outcome: Set to Outcome from Start and Wait for Approval output.
- Target user: Set to displayName from Start and Wait for Approval output.
- Run as user: Set to displayName from Start and Wait for Approval output.
Step 8: Save and Test the Flow
- Save the Flow:
- Click on Save.
- Test the Flow:
- Click on Test and follow the steps to trigger and verify the flow works as expected.
Final Outcome
Conclusion
Implementing this automated approval process ensures that purchase orders are reviewed by the appropriate managerial levels, maintaining effective control over expenditures while leveraging Microsoft Teams for efficient communication. The workflow is designed to trigger based on work item actions in Dynamics 365 Finance and Operations, initiating once for manager approval and again for director approval as necessary. This approach allows for seamless maintenance and extension of the standard workflow. The Power Automate flow is configured to run based on each work item action, eliminating the need for any changes to the Power Automate setup. This ensures a robust and flexible solution that adapts to the evolving needs of the organisation.
Expand Your Knowledge: See More Power Platform Blogs
Share this content:


Post Comment