


PP104 – Empower Your Journey: Power Platform ALM & Seamless Deployments with Azure DevOps (Authentication: Service Principal/Client Secret) Dev → UAT → Prod
What will you Learn After Reading this Blog
Dive into comprehensive guide and unlock the full potential of your Power Platform projects!
Here’s what you’ll master:
- Seamless Integration: Discover how to register and configure an Entra ID app, ensuring smooth and secure authentication for your deployments.
- Permission Precision: Learn to grant the right permissions to your Entra ID app, perfectly aligning it with your Power Platform environments.
- Azure DevOps Mastery: Set up and configure your Azure DevOps project with ease, from installing essential build tools to creating a robust service connection.
- Pipeline Perfection: Step-by-step instructions to establish and optimize your build and release pipelines, including multi-stage setups and pre-deployment approvals.
- Effortless Deployment: Achieve seamless deployments across Dev, UAT, and Prod environments with a streamlined approach that minimises errors and maximizes efficiency.
Introduction
Application Lifecycle Management (ALM) in the Power Platform is a critical process for businesses to effectively manage the flow of Power Apps, Power Automate, and other components from development to user test and to production. It ensures seamless collaboration, version control, and efficient deployment across different environments. With robust ALM practices, organisations can maintain high-quality applications, reduce errors, and accelerate time-to-market. Whether you’re a developer, administrator, or IT professional, mastering Power Platform ALM is essential for delivering successful business solutions
Prerequisite
- Azure security permission – For application registration (one of below role)
- Application Administrator
- Cloud Application Administrator
- Azure AD Administrator
- Global Administrator
- Power Platform permission – To create and manage environments (one of below role)
- Power Platform Service Admin
- Tenant Administrator
- System Administrator
- Azure DevOps Permission – To build pipeline (one of below role)
- Project Administrator
- Environment Administrator
- Global Administrator
- Power App premium license
- Azure DevOps License
Naming Conventions
In this blog, I have followed a consistent set of naming conventions to ensure clarity and uniformity. These conventions are applied to Environment, Azure services, Project and Pipelines. Below are the conventions used throughout this blog:
- Power Platform Environments:
- Development Environment – PP-DEV
- Testing Environment – PP-UAT
- Production Environment – PP-PROD
- Power Platform Solution Name
- Solution Name – PPALMSolution
- Entra ID Apps Name
- For Solution Export from Development Environment – PPExport
- For Solution Import in UAT and Production Environment – PPImport
- Azure DevOps Project name
- Power Platform DevOps Project
- Azure DevOps Project Service Connection
- Development Environment – PPDEVServiceConnection
- UAT Environment – PPUATServiceConnection
- Production Environment – PPPRODServiceConnection
- Azure DevOps Build Pipeline
- PPBuildPipeline
- Azure DevOps Release Pipeline
- PPReleasePipeline
- Azure DevOps Release Pipeline Stages
- UAT Stage – Release to PP-UAT
- Prod Stage – Release to PP-PROD
Assumption
You have appropriate licensing and security privileges for Power platform, Azure Entra ID and Azure DevOps as mentioned above. You have created 3 different Power Platform Environments of types one each: Development, UAT and Production.
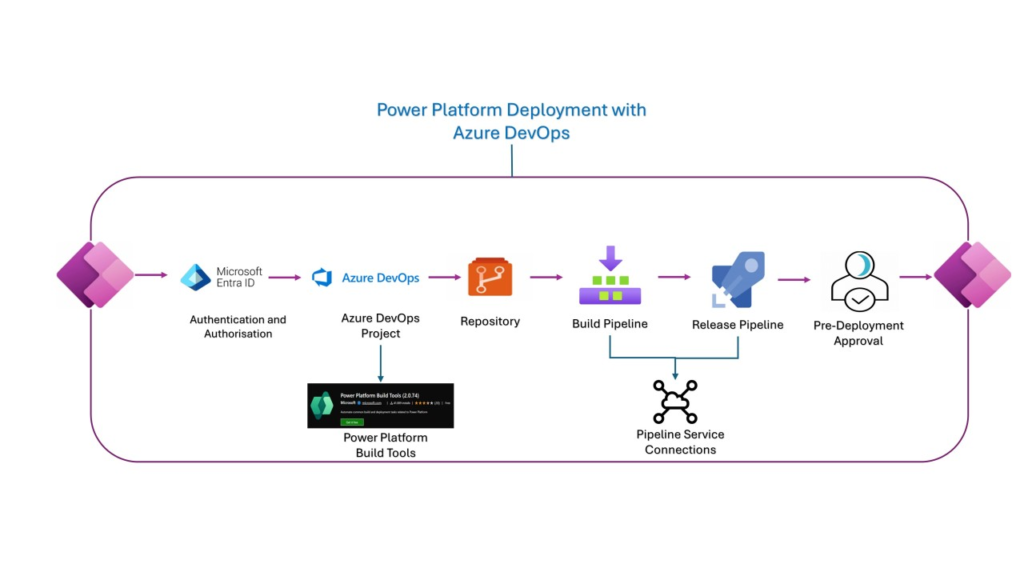
Entra ID Apps Registration
Registering an Azure application is a crucial step in setting up Application Lifecycle Management (ALM) using Microsoft’s Power Platform with Azure DevOps. The registered Azure application, also known as a service principal, is used to authenticate and authorise the Azure DevOps pipeline to interact with the Power Platform.
We will be registering two applications. One app is for the source/export (development) environment and the other for the target/Import (UAT and Production) environment. This separation enhances security, allows independent permission management, and ensures actions in one environment don’t impact the other. 😊
APP 1: For Solution Export
PP-DEV
Step 1: Sign in to the Azure Portal
- Open a web browser and go to Azure Portal (https://portal.azure.com/).
- Sign in with your Azure account credentials.
Step 2: Register a New Application in Azure AD
- In the Azure Portal, search for and select Azure Active Directory.
- In the left-hand menu, select App registrations.
- Click on + New registration.
- Register an application:
- Name: Enter a name for your app PPExport.
- Redirect URI: You can leave this empty for now.
- Click Register.
Step 3: Configure API Permissions
- After registering, you’ll be redirected to the app’s overview page. Select API permissions from the left-hand menu.
- Click + Add a permission.
- Select APIs my organization uses.
- Search for and select Azure DevOps.
- Under Delegated permissions, check the box for user_impersonation.
- Click Add permissions.
- Repeat steps 2-6 to add permissions for PowerApp:
- Search for and select PowerApps Runtime Service.
- Under Delegated permissions, check the box for user_impersonation.
- Click Add permissions.
- Click Grant admin consent for [Your Organisation] to grant the necessary permissions. Confirm the consent in the dialog that appears.
Step 4: Create a Client Secret
- In the left-hand menu, select Certificates & secrets.
- Under the Client secrets section, click + New client secret.
- Add a client secret:
- Description: Provide a description PPExportSecret.
- Expires: Select an appropriate expiration period.
- Click Add.
- Copy the Value of the client secret. This is your only chance to copy it; you’ll need it for authentication.
Step 5: Record Important Information
Make sure you record the following information, as you will need it to configure your app to authenticate with Azure AD:
- Application (client) ID: Found on the app’s overview page.
- Directory (tenant) ID: Found on the app’s overview page.
- Client secret Value: Copied from (Step 4.Point 5) Above.
APP 2: For Solution Import
PP-UAT and PP-PROD
Register an app with name e.g. ‘PPImport’ following same step as Application registration above. Make sure to record information mentioned in Step 5 above.
Assign Azure Apps permission to Power Platform
PP-DEV
Step 1: Assign Roles in Power Platform Environment
- Power Platform Admin Center:
- Go to Power Platform Admin Center. (https://admin.powerplatform.microsoft.com/).
- Sign in with an account that has the System Administrator or System Customizer role.
- Select Environment:
- In the left-hand navigation, click on Environments.
- Select the environment where you want to grant permissions.
- Open Settings:
- Click on Settings (gear icon) in the top-right corner.
- Security:
- Navigate to Users + permissions > Application users.
- Add Application User:
- Click on + New app user.
- In the pane that appears, search for your Azure AD app by entering the Application (client) ID or App Name ‘PPExport’.
- Select the app and proceed.
- Assign Security Roles:
- Assign the System Administrator or System Customizer role to the app.
- Click Save to apply the roles.
PP-UAT
Please follow steps 1-7 to grant permission to the ‘PPImport’ application in the Sandbox environment.
PP-PROD
Please follow steps 1-7 to grant permission to the ‘PPImport’ application in the Production environment.
Setup Azure DevOps Project
Step 1: Sign in to Azure DevOps
1. Open a web browser and go to Azure DevOps (https://dev.azure.com/).
2. Sign in with your Microsoft account credentials.
Step 2: Create a New Organization (if not already done)
If you do not already have an Azure DevOps organization, you’ll need to create one:
- After signing in, click on New organization if prompted.
- Follow the on-screen instructions to set up your new organization:
- Organization name: Enter a unique name for your organization.
- Region: Select the region closest to you.
- Click Continue to create your organization.
Step 3: Create a New Project
- Once you are in your Azure DevOps organization, click on New Project.
- Fill out the project creation form:
- Project name: Enter a name for project PowerPlatform DevOps Project.
- Description: Optionally, provide a brief description of your project.Visibility: Choose Private.Version control: Choose between Git.
- Work item process: Select Agile.
- Click Create project to create your new project.
Install Power Platform Build Tools Extension
- Sign in to Azure DevOps (If not already logged in) .
- Go to Azure DevOps (https://dev.azure.com/) and sign in with your credentials.
- Navigate to the Marketplace:
- Click on the shopping bag icon (Marketplace) in the upper-right corner or go to the Azure DevOps Marketplace (https://marketplace.visualstudio.com/azuredevops).
- Search for Power Platform Build Tools:
- In the search bar, type “Power Platform Build Tools” and select it from the search results.
- Install the Extension:
- Click Get it free.
- Select your Azure DevOps organization and click Install.
Create a Service Connections
We need to create three service connections (one for each environment) to allow Azure DevOps to communicate with Power Platform environments.
Connection 1: PP-DEV
- Navigate to Project Settings:
- Go to your Azure DevOps project.
- Click on the Project Settings (gear icon) at the bottom left corner.
- Create a New Service Connection:
- In the left sidebar, under Pipelines, click Service connections.
- Click New service connection and choose Power Platform.
- Fill in the Service Connection Details:
- Connection name: Enter a name for service connection PPDEVServiceConnection,
- Environment URL: Enter the URL of Power Platform environment (Power Platform Environment setting Page).
- Authentication method: Choose Service Principal.
- Client ID: Enter your Azure AD app’s client ID (Section 6.1, Step-5).
- Client secret: Enter the client secret (Section 6.1, Step-5).
- Tenant ID: Enter your Azure AD tenant ID, Step-5).
- Security: Choose grant access permissions to all pipelines.
- Verify and Save.
Connection 2: PP-UAT
Follow steps mentioned above to create service connection. Fill in the service connection details as below
- Connection name: Enter a name for service connection PPUATServiceConnection.
- Environment URL: Enter the URL of UAT Power Platform environment (Power Platform Environment setting Page).
- Authentication method: Choose Service Principal.
- Client ID: Enter your Azure AD app’s client ID (Section 6.2).
- Client secret: Enter the client secret (Section 6.2).
- Tenant ID: Enter your Azure AD tenant ID (Section 6.2).
- Security: Choose grant access permissions to all pipelines.
Connection 3: PP-PROD
Follow steps mentioned above to create service connection. Fill in the service connection details as below
- Connection name: Enter a name for service connection PPPRODServiceConnection.
- Environment URL: Enter the URL of PRODUCTION Power Platform environment (Power Platform Environment setting Page).
- Authentication method: Choose Service Principal.
- Client ID: Enter your Azure AD app’s client ID (Section 6.2).
- Client secret: Enter the client secret (Section 6.2).
- Tenant ID: Enter your Azure AD tenant ID (Section 6.2).
- Security: Choose grant access permissions to all pipelines.
Setup a Repository
- Sign in to Azure DevOps (If not already logged in)
- Go to Azure DevOps (https://dev.azure.com/) and sign in with your credentials.
- Navigate to Your Project:
- Select the organization and project where you want to create the repository.
- Create a Repository:
- In the left-hand menu, go to Repos.
- Click on the Repos dropdown and select Files.
- Click on Initialize under Initialize main branch with README or gitignore section.
- Grant Permissions
- Navigate to Project Settings (In the lower-left corner)
- Switch to Security Tab
- Select Power Platform DevOps Project Build User (or YourProjectNameUser) from under User section and setup ‘Allow’ under Contribute permissions on Right hand side.
- Select Project Collection Build Service Accounts from under Azure DevOps Group and setup ‘Allow’ under Contribute permissions on Right hand side.
Setup Build Pipeline
Final Output looks like this:

Step 1: Sign in to Azure DevOps (If not already logged in)
- Open a web browser and go to Azure DevOps(https://dev.azure.com/).
- Sign in with your credentials.
Step 2: Navigate to Your Project
- Select the organization and project Power Platform DevOps Project
Step 3: Create a New Pipeline
1. Go to Pipelines:
- In the left-hand menu, click on Pipelines.
2. Create New Pipeline:
- Click on New Pipeline.
Step 4: Define the Pipeline (Classic Editor)
- Classic Editor
- Select a Source – Azure Repros Git.
- Team Project – keep Default selection.
- Repository – Keep Default Selection.
- Default Brand for manual and scheduled builds – Choose Main.
- Click Continue.
- Select a Template – Click on Empty Job.
- Define Agent Job
- Display Name – Give a name PPExport.
- Additional Options – Check Allow Scripts to access the OAuth token.
- Please keep the default values for any fields that are already prepopulated and do not need changes.
Step 5: Define the Pipeline Tasks
- In the classic editor, click + Add to add tasks to your pipeline.
- Add the following 7 tasks by clicking + icon next to Agent name PPExport.
Task 1: Power Platform Tool Installer
- Please keep the default values for any fields that are already prepopulated and do not need changes.
Task 2: Power Platform WhoAmI
- Authentication Type – Choose Service Principal/Client Secret (Supports MFA).
- Choose Service connection – PPDEVServiceConnection.
- Environment URL – copy and paste this code $(BuildTools.EnvironmentUrl).
- Please keep the default values for any fields that are already prepopulated and do not need changes.
Task 3: Power Platform Set Solution Version
- Authentication Type – Choose Service Principal/Client Secret (Supports MFA).
- Choose Service connection – PPDEVServiceConnection.
- Solution Name – copy and paste this code $(SolutionName).
- Solution Version – copy and paste this code 1.0.0.$(Build.BuildNumber)
- Please keep the default values for any fields that are already prepopulated and do not need changes.
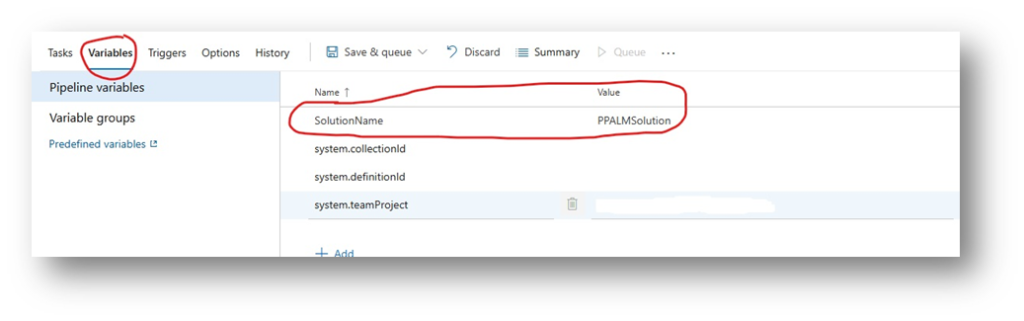
Define Solution Variable
- Switch from Task tab to Variable from top horizontal navigation.
- Click +Add and set name – SolutionName, Value – PPALMSolution.
- Switch back to Task tab
Task 4: Power Platform Export Solution (Note- we are exporting project as Managed Solution)
- Authentication Type – Choose Service Principal/Client Secret (Supports MFA).
- Choose Service connection – – PPDEVServiceConnection.
- Environment URL – copy and paste this code $(BuildTools.EnvironmentUrl).
- Solution Name – copy and paste this code $(SolutionName).
- Solution Output file – copy and paste this code. .$(Build.StagingDirectory)\$(SolutionName)_managed.zip.
- Tick Export as Managed Solution box.
- Please keep the default values for any fields that are already prepopulated and do not need changes.
Task 5: Power Platform Unpack Solution
- Solution Input file: Copy and paste this code $(Build.StagingDirectory)\$(SolutionName)_managed.zip
- Target folder to Unpack solution – copy and paste this code $(Build.SourcesDirectory)\$(SolutionName)\managed
- Type of Solution – setup to Managed
- Please keep the default values for any fields that are already prepopulated and do not need changes.
Task 6: Publish Build Artifacts
- Path to Publish- Copy and paste this code $(Build.SourcesDirectory)\$(SolutionName)\managed
- Please keep the default values for any fields that are already prepopulated and do not need changes.
Task 7: Command Line Script
- Script: Copy and paste this code and replace red text from the code to user Email Address and UserName.
cd $(Build.SourcesDirectory)

# Set a per-project email address and username
git config user.email "PROVIDE YOUR EMAIL ADDRESS HERE”
git config user.name "PROVIDE YOUR USER NAME HERE"

# Navigate to the main branch
git checkout -B main

# Update the local version of a repository from a remote
git pull

# Add all files to the Git repository
git add --all

# Record the changes in the repository
git commit -m "Updated the solution"

# Authenticate against a git repository in a build process
git -c http.extraheader="AUTHORIZATION: bearer $(System.AccessToken)" push origin main
- Please keep the default values for any fields that are already prepopulated and do not need changes.
Step 6: Save and Queue the Pipeline
- After configuring all tasks, click Save & queue at the top right.
- Provide a name for the pipeline and click Save and run.
Step 7: Verify the Pipeline
- Monitor the pipeline run to ensure all tasks execute successfully.
- Check the logs for each task to verify the output and troubleshoot any issues.
Step 8: Post Run Export
- Click on Repros > Files > Contents, from left navigation.
Create Release Pipeline
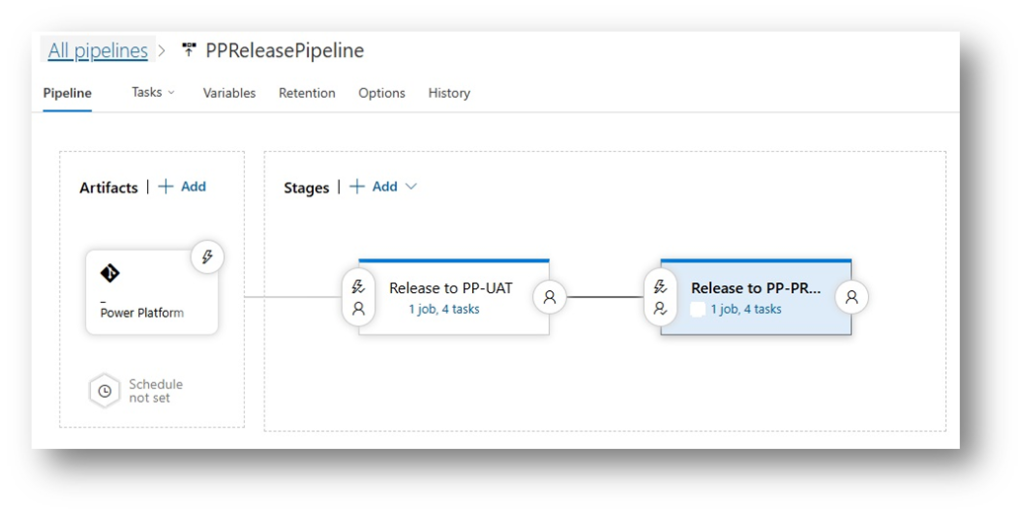
Final Output looks like this:
Step 1: Navigate to Azure DevOps Project (If not already logged in)
- Open a web browser and go to Azure DevOps (https://dev.azure.com/).
- Sign in with your credentials.
- Select the organization and project where you want to create the release pipeline.
Step 2: Create a New Release Pipeline
- In the left-hand menu, click on Pipelines.
- Click on Releases.
- Click New pipeline.
Step 3: Configure the Release Pipeline
Add an Artifact
1. Add an artifact:
- Click on the Add button under the Artifacts section.
- Select the source type – Azure Repros.
- Project – Choose PowerPlatform Project Power Platform DevOps Project.
- Source (Repository) – Choose Build pipeline created above PPBuildPipeline (This will open more fields).
- Default Branch – Choose Main.
- Please keep the default values for any fields that are already prepopulated and do not need changes.
- Click Add.
Add Stage for UAT
1. Add a stage:
- Click on the Add a stage button under the Stages section.
- Choose the Empty job template.
- Name the stage Release to PP-UAT
Step 4: Configure Stage Task
- Click on the stage name to configure the tasks.
- Give stage a name Release to PP-UAT.
Final Output looks like this:
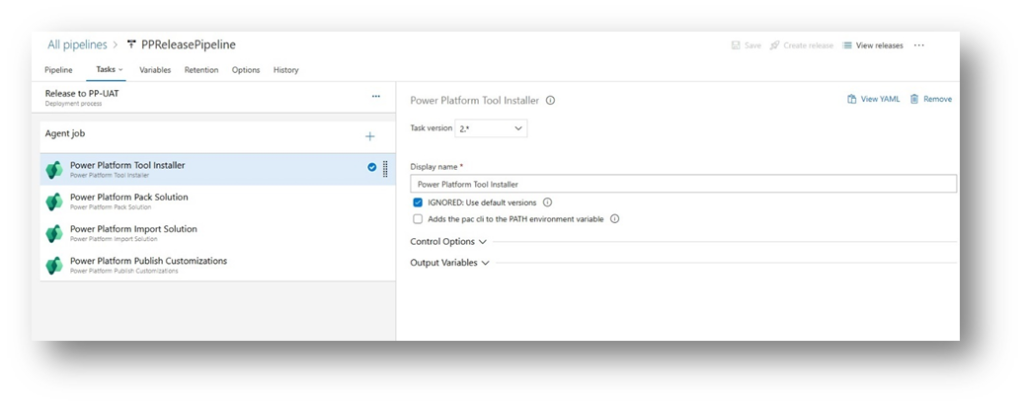
Task 1: Power Platform Tool Installer
1. Add a task:
- Click on the + icon to add a new task.
- Search for “Power Platform Tool Installer”.
- Select the Power Platform Tool Installer task and click Add.
Configure the task
- Please keep the default values for any fields that are already prepopulated and do not need changes.
Task 2: Power Platform Pack Solution
1. Add a task:
- Click on the + icon to add a new task.
- Search for “Power Platform Pack Solution”.
- Select the Power Platform Pack Solution task and click Add.
Configure the task:
- Display name: Power Platform Pack Solution.
- Source folder of Solution to Pack – Copy and Paste this code. $(System.DefaultWorkingDirectory)/_ Power Platform DevOps Project/ PPALMSolution/managed.
Task 3: Power Platform Import Solution
1. Add a task:
- Click on the + icon to add a new task.
- Search for “Power Platform Import Solution”.
- Select the Power Platform Import Solution task and click Add.
Configure the task:
- Display name: Power Platform Import Solution.
- Authentication Type: Service Principal /Client Secret (Supports MFA).
- Service Connection: select PPUATServiceConnection.Environment URL: copy and paste this code $(BuildTools.EnvironmentUrl).Solution Input File: copy and paste this code $(Build.StagingDirectory)\$(SolutionName).zipAdvanced section: Check ‘Import as Managed Solution’ box.
- Please keep the default values for any fields that are already prepopulated and do not need changes.
Task 4: Power Platform Publish Customizations
1. Add a task:
- Click on the + icon to add a new task.
- Search for “Power Platform Publish Customizations”.
- Select the Power Platform Publish Customizations task and click Add.
Configure the task:
- Display name: Power Platform Publish Customizations.
- Authentication Type: Service Principal /Client Secret (Supports MFA).
- Service Connection: select PPUATServiceConnection
- Environment URL: copy and paste this code $(BuildTools.EnvironmentUrl)
- Please keep the default values for any fields that are already prepopulated and do not need changes.
Step 5: Save the Pipeline
1. Click Save at the top right of the page to save the pipeline configuration.
2. Provide a name for the release pipeline if prompted.
Step 6: Create a Release
1. Click Create release to start a new release.
2. Select the artifact version and click Create.
3. Monitor the release progress and logs to ensure all tasks execute successfully.
Add Stage for Production
1. Clone UAT Stage:
- Hover over Release to PP-UAT
- Select Clone.
- Clonning process copies Stages, task and task parameters.
Step 1: Verify Stage Task (Only for Verification)
Task 1: Power Platform Tool Installer
Task 2: Power Platform Pack Solution
1. Task to verify:
- Source folder of Solution to Pack – Copy and Paste this code $(System.DefaultWorkingDirectory)/_ Power Platform DevOps Project/ PPALMSolution/managed
Task 3: Power Platform Import Solution
1. Task to verify:
- Authentication Type: Service Principal /Client Secret (Supports MFA).
- Service Connection: select PPPRODServiceConnection
- Environment URL: copy and paste this code $(BuildTools.EnvironmentUrl)Solution Input File: copy and paste this code $(Build.StagingDirectory)\$(SolutionName).zip
- Advanced section: Check ‘Import as Managed Solution’ box.
Task 4: Power Platform Publish Customizations
1. Task to verify:
- Authentication Type: Service Principal /Client Secret (Supports MFA).
- Service Connection: select PPPRODServiceConnection
- Environment URL: copy and paste this code $(BuildTools.EnvironmentUrl)
Step 2: Save the Pipeline
- Click Save at the top right of the page to save the pipeline configuration.
- Provide a name for the release pipeline if prompted.
Step 3: Create a Release
- Click Create release to start a new release.
- Select the artifact version and click Create.
- Monitor the release progress and logs to ensure all tasks execute successfully.
Run Pipeline
Step 1: Create a New Release
- Navigate to Releases:
- In Azure DevOps, go to your project.
- From the left-hand menu, select Pipelines and then Releases.
- Create a Release:
- Click the Create release button in the top right corner.
- In the Create a new release dialog, select release pipeline PPReleasePipeline.
- Choose the artifact version you want to release. This will usually be the latest build from your build pipeline.
- Click Create.
Step 2: Monitor the Release
- Monitor the Release:
- Once the release is created, it will be listed in the Releases section.
- Click on the newly created release to see the details.Monitor the progress of each stage and task within the release.
- Ensure all tasks execute successfully without errors.
Step 3: Add Post-Release Test
- To run tests after the release, you need to add a task to your pipeline that triggers the tests.
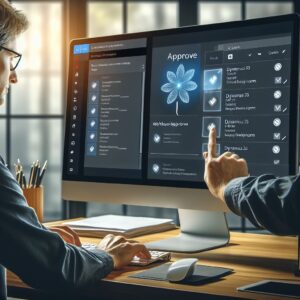
Pre-deployment Approval
Step 1: Navigate to Your Release Pipeline
- Open your Azure DevOps project.
- Go to Pipelines > Releases.
- Select your release pipeline from the list.
Step 2: Edit the Stage to Add Pre-Deployment Approvals
- Click on the Edit button in the top-right corner of the release pipeline screen.
- In the Pipeline tab, click on the Pre-deployment conditions icon (the little person icon) on the stage where you want to add the pre-deployment approval (e.g., “Release to PP-Prod Stage”).
Step 3: Configure Pre-Deployment Approvals
- Enable Pre-Deployment Approvals:
- In the Pre-deployment conditions pane, toggle the Pre-deployment approvals switch to Enabled.
- Add Approvers:
- Click on Add under the Approvers section.
- Enter the names or email addresses of the users or groups you want to add as approvers. You can add multiple approvers if needed.
- Choose whether All approvers are required, or Anyone can approve.
- Set Approval Options (Optional):
- Timeout: Specify the timeout period after which the approval request will expire.
- Reassign: Allow approvers to reassign the approval to another user.
- Comments: Require comments when approving or rejecting the deployment.
- Save and Close:
- Click Save in the Pre-deployment conditions pane.
Results
By following this guide, you should have successfully executed both your Build and Release pipelines. Here’s a breakdown of what each pipeline accomplishes:
- Build Pipeline: Exports the solution specified in the solution variable.
- Release Pipeline: Retrieves the solution artifacts from source control, releases them to the UAT environment, and triggers an approval request. Upon successful testing and approval, the pipeline will deploy the solution to the production environment.
Congratulations on achieving a streamlined ALM process!
Happy ALM! Happy Automation!
Expand Your Knowledge: See More Power Platform Blogs
Share this content:


Post Comment